Monday, April 8, 2013

April Closet Organization

Hello, all!  I know that I haven't posted in a while, but I do have plans for at least three posts this week.  So, please forgive me for being away.

Lately, I have been searching through piles of clutter in my closet that holds all of my toiletries, cleaning supplies, linens, and accessories.  That may sound like a random list of things, but I live in a dorm and space is limited. 

One area of this closet that was very cluttered was the top of the closet:


As you can see, it was pretty messy over in the right corner.  Now, a while back I did a makeover of some Dollar General Storage bins which helped with this clutter some, and you can see them on the left part of the shelf. But, I decided that pesky right corner need some organization love to. So, I decided to go to Wal-Mart and find a bin perfect for all of my cleaning products.

Here is what the top of the closet looks like now:


I love the new storage bin, and it makes it much easier for me to pull the cleaners down off of the shelf.  This shelf is particularly tall, and the handled bin helps a great deal. Also, it was under $2 which is a plus.

Another area of my closet that was a complete wreck was the bottom drawer of the tall pink organizer:


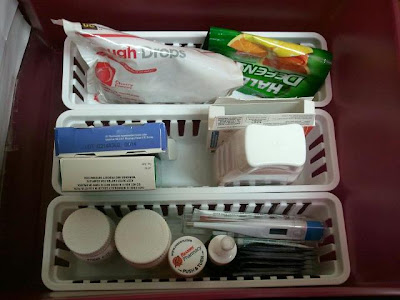
In this drawer, I store medicine and medical supplies.  Here is what the inside of the drawer looked like before I organized it:


What an absolute mess!  The bars of soap found a home in the top of the closet with the other cleaning supplies. 

Here is what the drawer looks like now:


What an amazing transformation, and it so functional!  Here is a shot of what these storage containers look like from the side:


I bought these at Wal-Mart as well in a pack of 3 for under $2.  What a great find!  I found all of these storage bins on the kitchen storage isle.

Thanks for reading, and I hope you all are doing great.  Be sure to leave me a comment below about the projects that you are working on!!

Don't forget to follow me on Pinterest:   Owl Enthusiast

Love,


Tuesday, March 26, 2013

Shabby Chic Bird Key Makeover

Hello, lovelies! I am terribly sorry for my absence this month, but I have been on Spring Break for the past two weeks. So,  I have been super busy working. I was able to get a job for the spring and summer at a beautiful greenhouse/garden shop in my hometown. But, I did not take pictures of it. Shame on me!

I do have a quick project to share with all of you though. I mentioned this project in one of my previous posts from this month: March Craft Projects.  What I originally intended to do was to recreate the Refurbished Key Portrait Tutorial  from Amy's blog Mod Podge Rocks:


However, I have yet to find a pretty frame that I am happy with.  So, for now I have just given my rot iron bird key a shabby chic makeover.  Here is a close up of the the finished product:


 Here is a shot of my shabby chic bulletin board and my key:


I decided to hang this key above my shabby chic inspired bulletin board that I made last year.  I hope you like it!  I used Apple Barrel Ivory White Gloss Paint that I purchased for under $2 at Wal-Mart.  I used a dry brush technique to give the key a shabby chic feel.

I absolutely can't wait to display this in my apartment one day.  I hope you are all doing well!! Leave me a comment below and tell me what craft projects you are working on this month.

Don't forget to follow me on Pinterest:  Owl Enthusiast 

Love,

Saturday, March 9, 2013

Outfit of the Day and Birdcage Project!

Hello, all!  I hope you are having a wonderful weekend.  I recently went shopping for a new springtime dress, because I have an awards assembly and my fiance's graduation coming up.  I cannot tell you how many dresses I tried on yesterday at Maurices.  They have so many gorgeous vintage looking dresses, but none of themwith the exception of onefit quite well.  However, the dress  that did fit was $44.  I did not like the sound of that price. Here is what the dress looks like:


I really liked this dress, and I loved the color.  It has tiny gold dots all over the fabric.  But, I really wanted something floral with a more vintage feel.  So, I went over to Rue 21, and I found the absolute perfect dress.  Here I am wearing it just for you all: 


I love this dress, and it was only half the price of the other dress at $22.  I am so happy I found this, and I have the perfect accessories to match.  The tan cardigan is from Maurices, my brown shoes with bows are from Payless, and my pearl necklace and bracelet are both from American Eagle Outfitters.

Also, I have been searching for birdcages to decorate my wedding next spring.  I happened to find one for $5 at Earthbound Trading Company just yesterday.  Here is a picture:


I plan on painting it a lilac color and painting the hanger white.  Also, I am going to put a pretty gray bow on the hanger as well.  Additionally, I plan to put some wooden love birds or a mason jar with flowers inside.  As you could probably guess, my wedding colors are purple, white, and gray.  I just love purple!  I will post more pictures once I finish the project. 

Well, I hope you are all having a great weekend.  Let me know if you are working on anything in the comments below.

Don't forget to follow me on Pinterest:  Owl Enthusiast

Love,

Thursday, March 7, 2013

2013 Owl Lover Calendar

Today, I went over to My Owl Barn, and I found a lovely PDF for a free 2013 Owl Lover Calendar.  You get to pick which owl illustrations you want for each month, and then you download the PDF file.  Super easy and a great find!  Needless to say, I was inspired to make my own.  I used scrapbook paper, stickers, and ribbon all purchased from Wal-Mart in the past.  I just love how the vintage looking paper looks up against these beautiful illustrations.

Here is a picture of the calendar cover:

The assembly of the calendar was quite simple.  First, I choose the paper I wanted. Then, I used a three hole punch to place holes at the top of each piece.  After this, I cut and applied the sheets from the owl calender  to the scrapbook paper with tape.  Then, I cut two medium sized pieces of ribbon and tied them to the two outside holes in bows.  Lastly, I took a thumb tack and some ribbon with a butterfly detail and glued the ribbon to the tack.

I love how it turned out, and it was super easy.  You may notice that November and December had to share a page, so the numbers are slightly off on this page.  Here are close ups of all of the months (with the exception of January and February):

March:
April:
 May:  
June:
July:
 August:
September:
 October:
November & December:
Thanks for reading, I hope you enjoyed this post.  Be sure to go over to My Owl Barn, so you can make your own owl calendar! Ask me any questions in the comments below.  Also, let me know if you guys are working on anything exciting.  

Don't forget to follow me on Pinterest:  Owl Enthusiast

Love, 

Outfit of the Day

Hello, lovelies!  So, today I thought I would let you get to know a little bit more about me by sharing my outfit of the day with you:

I love fashion, but I also love comfort! It has been warmer this week, so I was able to get away with not having to wear a coat.  I can't wait for Spring!

Let me break down the pieces of my outfit for you:

Charcoal Ruffled Top:  From Maurices, I absolutely love this shirt.  It also has capped sleeves.
Dark Washed Skinny Jeans:  From Cato, these are so comfortable and stretchy.  I got these recently for my birthday, and I couldn't be happier with them.  I am seriously considering buying another pair.
Black Cardigan:  From Wal-Mart, I purchased this several years ago.  Its a thicker knit, and I have worn it many times over the years.
Floral Black Shoes:  From Payless, I got these last spring.  They have a stretchy strap in the back, so they don't kill my heels.  They also have an adorable bow detail.
Charcoal Tote:  From Maurices, I bought this for my teaching internship this past fall.  It has huge side pockets that allow me to carry books and notebooks; I love it!
Heather Gray Headband:  From Walmart, I bought this in a set that came with two other headbands in black and navy.

Thanks for reading, I hope you enjoyed this post.  This is a little different than my usual posts, but I absolutely love outfit of the day posts.  So, I couldn't resist doing one.  I hope you all are having a great day.  Have you purchased any clothing items that you can't live without lately?  Let me know in the comments below.

Love,

Drawer Dividers!

Hello there lovelies!  I hope everyone is doing well. If you read my March Craft Projects post, then you know that I have been on a mission to give my desk drawer full of jewelry a much needed makeover.  The best way I thought that I could achieve this was by creating my own storage dividers by re-purposing some items I already had, and I have done just that!

 As mentioned previously, I was inspired to tackle this project after seeing Jen's post: DIY Cereal Box Draw Dividers.  So, I picked out a couple of lovely pieces of scrapbook paper and gathered up my boxes in order to make my life a little more organized.

 I am embarrassed to even show you what my desk drawer looked like before the transformation, because it was just so messy.  But, here goes:
 You can definitely see why I needed some drawer dividers in my life!  I could never find anything before, but that wont be a problem now. 


Here is the finished product: 
I really  love how it turned out!  I hope this inspires me to wear more of my jewelry now that I can see it all.  I used a variety of boxes: a spaghetti box, two tea boxes, and a cracker box.  Can you believe it?  Also, the paisley drawer liner is really just some fabric that I received for my birthday from my best friend, Katie, back in 2012, and I have been dying to use it.  

Here is a close up of the dividers:  
As always, thanks for reading.  I hope you all are working on some fun craft projects of your own!  You should leave me a comment below telling me what you are working on. I would love to hear about your projects.  

Don't forget to follow me on Pinterest:  Owl Enthusiast

Love, 

Wednesday, March 6, 2013

March Craft Projects


Hello, everyone!  I hope you all are doing well.  This week, I thought that I would let you know what is on my craft agenda for March.

As of lately, I have been even more addicted to Pinterest! This has given me many craft project ideas that can be achieved by simply re-purposing things I have and giving items much needed makeovers.  I cannot wait to get started on creating and designing these projects!

Here are some of the projects I hope to accomplish this month:

1.  Spray Painted Folding Desk Chair:  As some of you may not know, I am a college student who lives on a budget.  Therefore, I have to make do with what I have. So, I thought I would give my ugly folding chair a new look.

I would like to try to achieve something similar to The Moon and Me's makeover that you can access here: Paint Your Wagon - Or at Least Your Folding Chairs. Here is a gorgeous picture from the makeover on this blog:


 I hope this can be done by purchasing one can of spray paint!  I haven't decided on the exact color yet, but I am leaning toward lilac.

2.  Framed Key Wall Art:  I love wall art, and I especially love creating my own.  One post that has particularly been on my mind since seeing it is this Refurbished Key Portrait Tutorial on Amy's blog Mod Podge Rocks:


I just so happens that I have the perfect key to complete this project that my mom purchased for me at Hobby Lobby not too long ago.  She has a ton of old keys displayed on the wall of her craft room at home, and she knows how much I love them.  So when she saw a vintage looking, rot iron key with birds on it, she just had to buy it for me--I LOVE birds.  If I remember right, it wasn't more than $10.  I absolutely can't wait to paint my key a fun color and pick out an ornate frame as well as a fun background graphic.  I definitely plan on hanging this near the entry to my apartment in the Fall. 

3.  Drawer Dividers:  As some of you may know, I am obsessed with pretty storage and organization ideas.  I just love knowing where something is at a moments notice without having to dig for it in the process.  That is why I absolutely cannot wait to try this Cereal Box Drawer Divider Tutorial from Jen over at I Heart Organizing:


Don't you just love the bright colors and how everything has it's own neat little place!  I have the perfect scrapbook paper to achieve this project.  Also, this project is of special interest to me, because I keep all of my jewelry in my desk's only drawer in my dorm.  Let me tell you, it is a mess.  So, this is going to be the perfect transformation. 

I can't wait to get busy on these projects and show you the before and after processes!  I hope this post inspired you, gave you some new craft ideas, or gave you some new blogs to follow.  Happy crafting, everyone!  What are you working on for the month of March?  Let me know in the comments below. 

Don't forget to follow me on Pinterest here:  Owl Enthusiast

Love,

Monday, March 4, 2013

March's Words to Live By

 
Hello, lovely people!  So, this month I have chosen the above quote for my words of wisdom. I created this graphic just for you.  I am pretty obsessed with the blue and pink color combo right now, and I had a lot of fun creating this. I visited Gina's blog The Shabby Creek Cottage and participated in her Six days of Spring Link Party.  Be sure to visit her, share your spring links, and view the other spring links as well. 

*Note* This is Gina's lovely image.  I do not have any rights to it. 

 All of my life, good things have come from stepping outside of my comfort zone.  When I push myself accomplish something that I am a little afraid or nervous to dolike making or presenting a speechI always feel incredible and empowered once I actually do it.  There is definitely a sense of accomplishment that I get from pushing my own boundaries.  Also by trying new things that are unfamiliar to me, I am able to become a happier and more content person.  I love setting new limits for myself that I can keep pushing.

So, my challenge for you this month and this Spring is to step outside of your own comfort zone.  You may be surprised by the results!

I do not know where this quote originated from, but I came across it by reading this darling post on Facebook:


You can read about this picture here:  Girls the TV show on Facebook

Thanks for reading!  Happy crafting, and I hope you all are doing well.

Love, 

Wednesday, February 27, 2013

Makeover of Storage Bins!

I am all about organization in my life, so naturally I have tons of storage bins.  I use them for anything from storing cosmetics to tools.  I have a set of storage bins that I purchased at two different times from Dollar General for $3 a piece.  I would like to display them in my bathroom once I move into an apartment, so I decided to give them a much needed makeover. 

Here is the before: 
 
 Not the prettiest thing to look at, right? It just so happens that I found the perfect fabric to cover these bins while browsing at Walmart a few days ago.  You can see it hiding underneath the bins in the above picture.  Today, I went and purchased 2 1/2 yds. of the lovely floral print, and I got to work. 

I didn't really follow any kind of tutorial, because I have done projects like this before.  Let me tell you, it is a very time consuming process, and I burned myself with my hot glue gun I don't know how many times. The project took me a couple of hours to complete in total because of all the measuring, cutting, and gluing.  So much gluing!  But, the finished product was completely worth it.

Here is the after:


I absolutely love how they turned out, and I am so happy that they are a matching pair now!   There is just something about pretty storage that I just can't get enough of.

 Here is a close up of the front next to a close up of the side: 


Thanks for reading!  I had so much fun doing this project, and I hope you all are working on some fun projects as well.  Happy crafting!  Don't forget to leave me a comment or ask me any questions below.

You can follow me on my Pinterest here:  Owl Enthusiast

Love, 

Monday, February 25, 2013

February's Words to Live By


Monthly, I will be choosing motivational and inspirational quotes to display on my in my blog posts.  All of the graphics will be one hundred percent created by me every time.  So, these posts will still be me sharing something that I have created with you. I love typography, and I hope to come up with some more creative designs in the future. 

I am not quite sure where this quote first originated, but I discovered it while listening to the song "Kill Your Heroes" by Awolnation.  I just love the meaning that is conveyed through this quote in so few words.

So many times in life, I have had to overcome my fears in order to progress and grow as person as well as to make my life better.  In order to truly live and get the most out of life, I strongly believe that you have to have some part of this philosophy instilled in you. 

I can't take all the credit for this wonderful motivational post idea.  I got this idea from a fellow blogger, Louise,  who does a segment on her blog called "Motivational Mondays."  Louise is a lovely Youtuber and blogger, and you can follow her here:

Youtube: Sprinkle of Glitter's Youtube
Blogger: Sprinkle of Glitter's Blog

Thanks for reading, and I hope you are having fun working on creative projects!

Love,

Sunday, February 24, 2013

Fabric Covered Cork Board Tutorial!

This is one of my favorite projects to do over and over again.  I don't know what it is, but I just love making fabric covered cork boards.  I started making my own bulletin boards in high school, and the first one I made was very elaborate and time consuming.

Then, my freshman year of college I started making them for all of my friends as gifts.  It just became a therapeutic hobby for me. I even gave a demonstrative speech about how to make a fabric covered cork board in my college speech class.  Let me tell you, it was a pretty kick ass speech!

Over the past few years, I have refined the process, and it now only takes me about 30 minutesgive or take to create one.  Today, I thought I would share my process and pictures of the one that I have made recently to match my room decor with you.    

You will need:
  1. A hot glue gun
  2. Plenty of glue sticks
  3. A spool of ribbon
  4. Several tacks
  5. A pretty piece of fabric of your choosing
  6. A cork board
  7. A pair of scissors 
  8. Command strips
After you have gathered your supplies, you are ready to create your own beautiful fabric covered cork board.
  • Step 1:  Cut your fabric to size.  Make sure that you leave two inches of slack all the way around, so you can adhere the fabric to the back of the board.  
  • Step 2:  Heat up your hot glue gun.  Flip your fabric upside down, and place your cork board upside down on top of the fabric.  Adjust the cork board until it is centered on the piece of fabric.
  • Step 3:  Fold the extra two inches of fabric and pin it to the back of the cork board all around the edges.
  • Step 4:  Take your hot glue gun and apply a thin layer of glue underneath the folded fabric all the way around. Remove the tacks as you go.
 At this point, you could technically be finished with your fabric covered cork board, or you could have fun and decorate it.  I generally opt for decorating it. 
  • Step 5:  Take your ribbon and cut six pieces. (2 pieces long enough to create an x shape across the entire board, and 4 pieces to apply to each corner of the board.)
  • Step 6:  Place each piece of ribbon on the board as mentioned above. Tack the ends of the ribbon to the back of the board like you did with the fabric.  
  • Step 7:  Remove each tack individually and glue as you go.  
  • Step 8:  Take 5 tacks and cut out pieces of fabric large enough to cover the tacks.
  • Step 9:  Glue the fabric to the tacks, and apply the tacks to the board.  
  • Step 10:  Add pictures or memos.  Attach Command adhesive strips to the back and hang on the wall.  
Here is the finished product:  
 I have made dozens of these over the years, and this one has to be my absolute favorite!  Here is a close up of one of the fabric covered tacks:
I just love all the colors that are incorporated into this fabric.  It has a little bit of bohemian and modern feel to me.  It matches the colors of my current bedspread marvelously.  Also, I have had my eye on it for quite some time.  I spotted it this past summer at Walmart.  There were three beautiful modern bolts that all had the same color scheme. I already used the paisley fabric that compliments this one when I decided to give my mismatched storage boxes a makeover.

You can see this bulletin board in its new home and those storage boxes in this picture:
I just love the way this cork board ties my room decor together. Thanks for reading!  Feel free to leave me comments and ask questions below.  Happy crafting!

Don't forget to follow me on my Pinterest:  Owl Enthusiast

Love,